

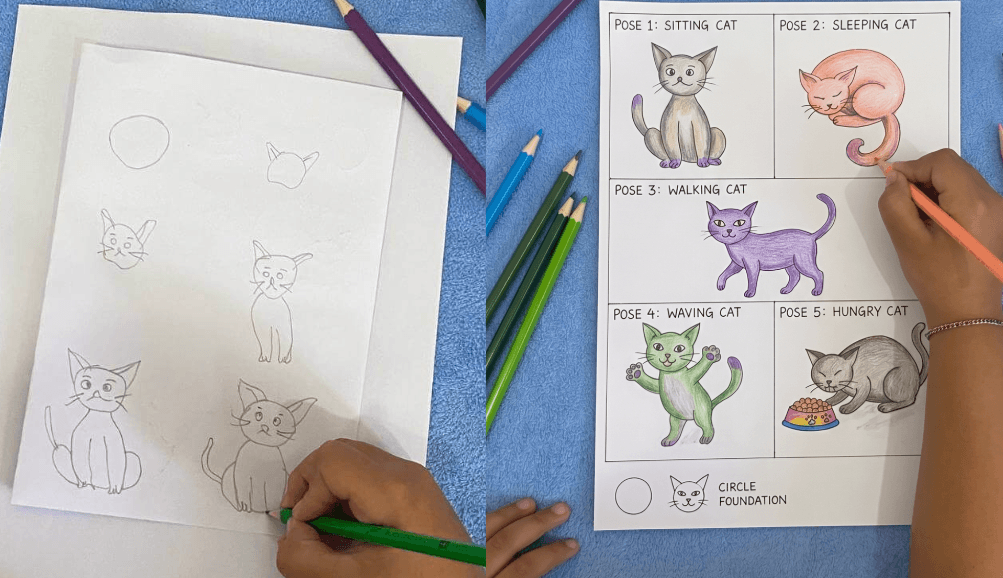
If your kids love animals, learning how to draw a cat is one of the best afternoon activities you can do together at home.
Drawing animals can feel intimidating at first, but there is a simple trick that makes it approachable for any child: start with the number “0,” which is just a circle.
From that single shape, kids can draw five completely different and adorable cats, each with its own personality.
Key Takeaways
- The secret to making cat drawing easy for kids is to start with a single circle (the number “0”) as the cat’s head.
- From that single circle, children can draw 5 completely different cat poses: sitting, sleeping, walking, waving, and eating.
- You only need paper, a pencil, an eraser, and some colored pencils or crayons.
- Each pose is broken into clear, bite-sized steps so kids can follow along at their own pace without getting frustrated.
- This method works well as a fun drawing activity for kids at home, especially on slow weekend afternoons.
- Once children learn the circle method, they can invent their own cat styles, colors, and personalities.
How One Sunday Afternoon Changed How We Draw
Whenever my 8-year-old daughter wanted to draw, I used to buy her sample drawings and stickers to copy.
Some she could manage beautifully, and others left her in tears of frustration.
Our drawing sessions together could swing from warm and joyful to tense and gloomy depending on how the picture turned out.
Then one Sunday at 3:00 PM, everything shifted.
We were sitting together as usual, pencils out, paper ready, when my husband looked up and said, “Today, let’s play a drawing game using our own imagination.” He asked our daughter, “What do you want to draw?”
She said, “A cat.”
Her dad smiled and replied, “Okay. Daddy will give you just one thing: the number ‘0’. Can you draw your favorite cat starting from that?”
That one question changed how she drew forever. My daughter sat down with her supplies and showed me just how much you can create from a single shape.
Come on! Grab some paper and let’s start drawing together.
What You Need
Before jumping into the steps, gather these basic art supplies. Nothing fancy is required to create something wonderful:
- Blank white paper
- Pencil for the initial sketch
- Eraser for fixing small mistakes
- Circle ruler or stencil (optional, but great for drawing a neat “0” shape)
- Colored pencils or crayons to bring each kitten to life
The Secret Foundation: Start with the Number “0”
Here is what makes this simple cat drawing for kids so beginner-friendly. Every single cat pose in this guide starts exactly the same way.
Draw a simple, medium-sized circle near the top of your paper. This circle is the cat’s head. That is all you need to get started.
Once you have your circle, you are ready to choose which pose to draw. The circle does the hard work of anchoring the whole drawing, so kids can focus on the fun parts: ears, eyes, tails, and personality.
5 Easy Cat Poses to Draw for Kids
Here are five different ways to transform that one circle into a lovely little kitten, with clear steps for each.
1. How to Draw a Sitting Cat for Kids
This is the perfect starting pose for beginners. The kitten sits upright and looks right at you.
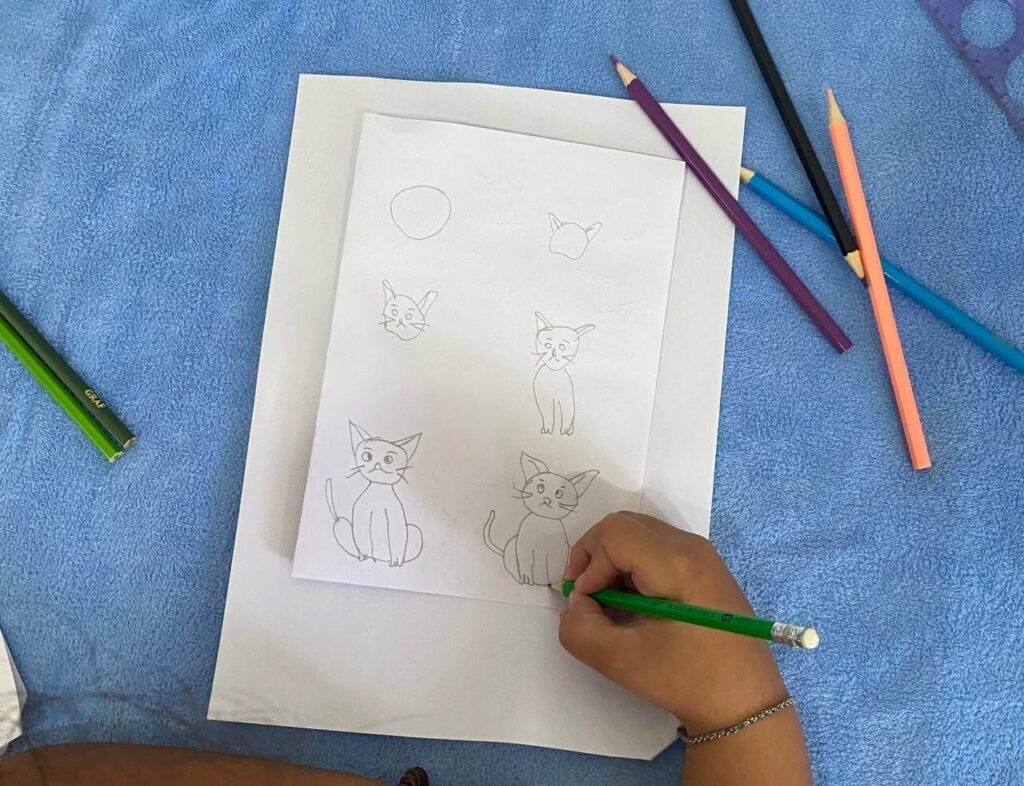
Step 1 — Ears: On top of your circle, draw two sharp triangle shapes pointing upward.
Step 2 — Face: Add two round eyes with a sparkle dot inside each one. Draw a tiny triangle for the nose and a small “W” shape for the mouth. Add three whiskers on each side.
Step 3 — Body: Draw a rounded pear shape extending downward from the head. Keep it full and soft, wider at the bottom.
Step 4 — Legs and Tail: Add two straight lines down the center for the front legs. Draw a curved tail wrapping gently around one side.
When my daughter finished this one, her dad leaned over and said, “Oh! This cat looks sad.” She immediately replied, “That’s because Mr. Boy didn’t give him any food.” We all burst out laughing.
That little cat with its downturned mouth became one of our favorites.
2. How to Draw a Sleeping Cat for Kids
There is nothing cuter than a little kitten curled up like a ball. This is a lovely, peaceful pose that even very young children can manage.
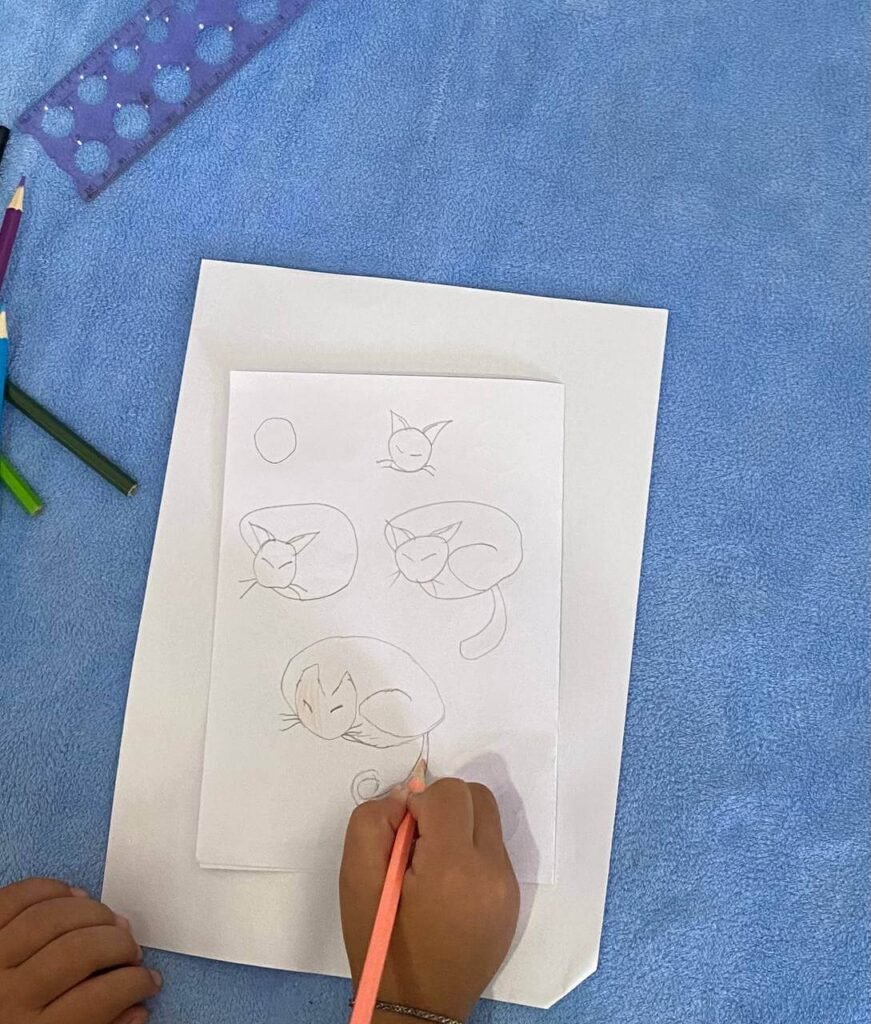
Step 1 — Face: Instead of open eyes, draw two small downward-curving lines to show closed, sleeping eyes. Add tiny whiskers and a soft little nose.
Step 2 — Body: Draw a gentle half-circle curving behind the head to suggest a curled-up back.
Step 3 — Tail: Draw the tail curving all the way around so it tucks right under the kitten’s chin, keeping it snug and cozy.
When she finished, I asked, “What is this picture about?” She answered without looking up, “A sleepy cat, because it played too much last night.” Somehow that explanation made the drawing feel even more alive.
3. How to Draw a Walking Cat for Kids
Time to get this kitten moving! This pose is a great next step after the sitting cat, and it introduces a longer body shape.
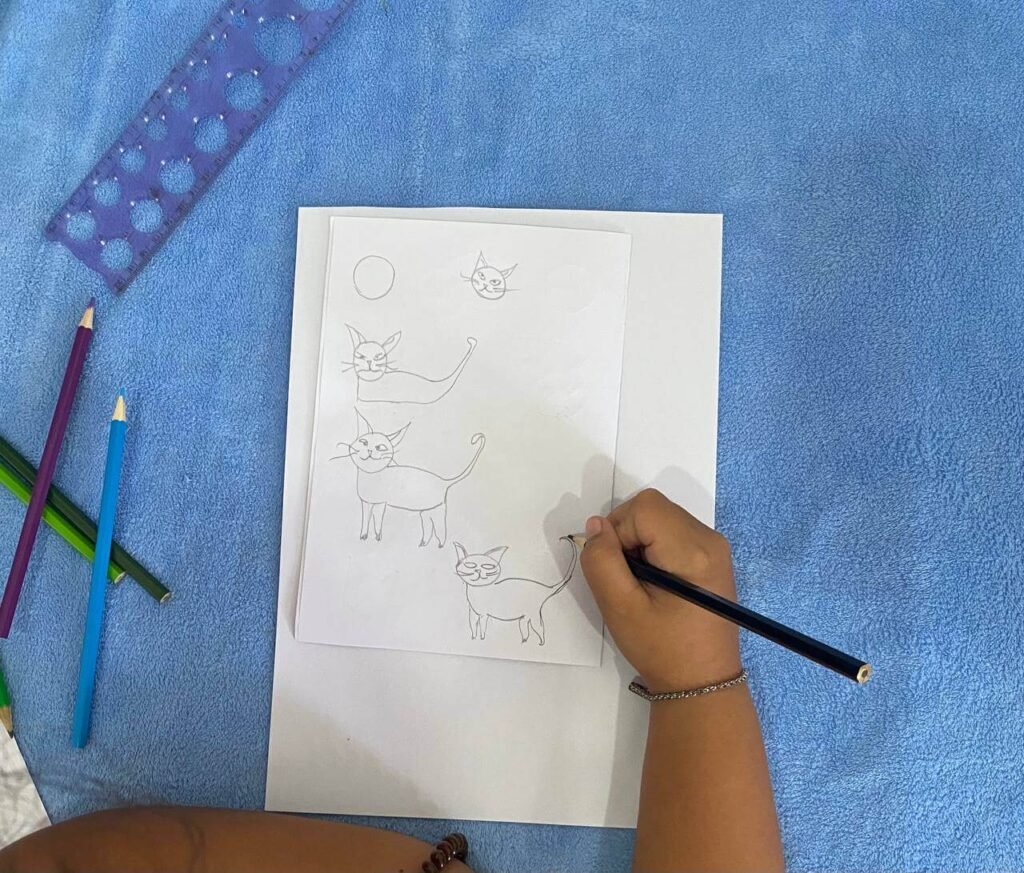
Step 1 — Face: Draw the eyes glancing slightly to one side to give the cat a curious, alert expression.
Step 2 — Body: Instead of a round body, draw a long horizontal oval behind the head. This stretched shape is what gives the cat its walking posture.
Step 3 — Legs: Add four straight, sturdy legs pointing downward beneath the body.
Step 4 — Tail: Draw a long tail pointing straight up with a small hook-like curve at the very tip.
Her dad looked at the finished drawing and asked, “Why does this cat have such a long body?” She shot back, “That’s how a cat stays fit and watches its figure!” We all had a very good laugh at that.
4. How to Draw a Waving Cat for Kids
This playful pose is full of energy and is a great chance to get creative with color.
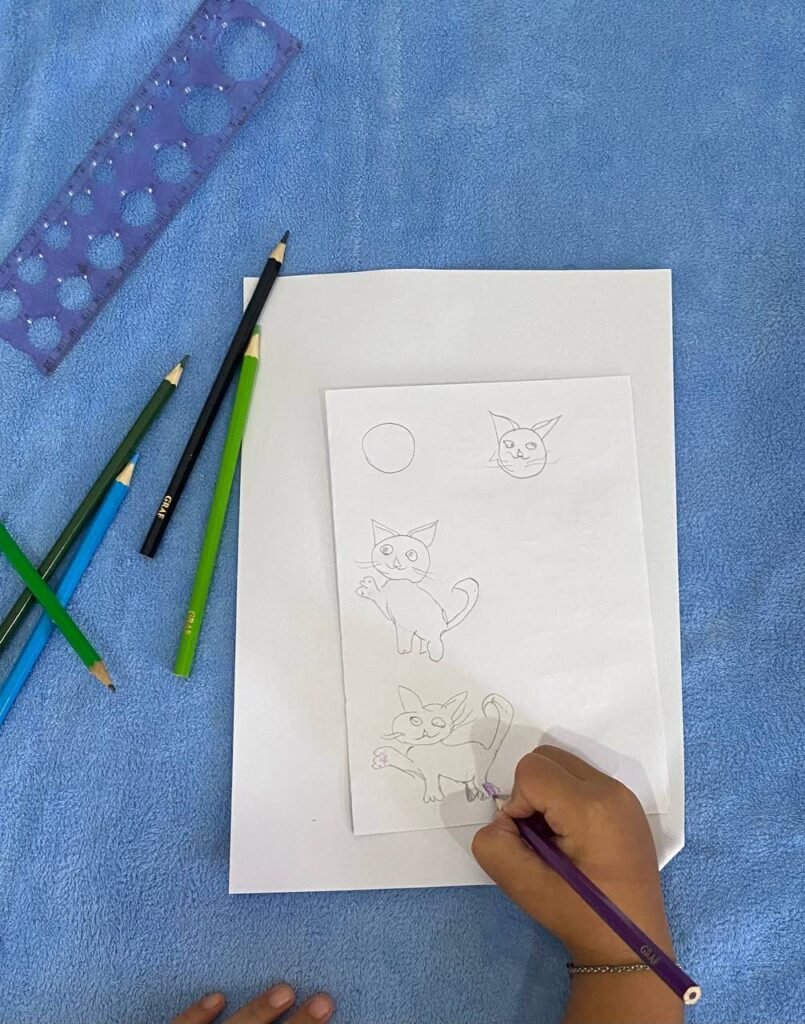
Step 1 — Head and Face: Follow the same starting steps as the walking cat. Draw the circle, add ears, and give it a lively expression.
Step 2 — Body and Hind Legs: Draw the horizontal body and back legs the same way as in the walking pose.
Step 3 — The Action: Instead of drawing both front legs on the ground, lift one paw upward and forward, as if the kitten is catching a butterfly or waving hello.
Step 4 — Color: Once the outline is done, color the paws and tail in a fun, unexpected color. My daughter chose purple, and it looked wonderful.
When her dad asked why the cat was lifting its leg, she said with full confidence, “It’s waving goodbye for when I go to the market.” The little details she adds to every drawing make each one feel like a tiny story.
5. How to Draw a Hungry Cat for Kids
All that playing and walking eventually leads to one thing: snack time! This pose is sweet, funny, and very relatable for kids.
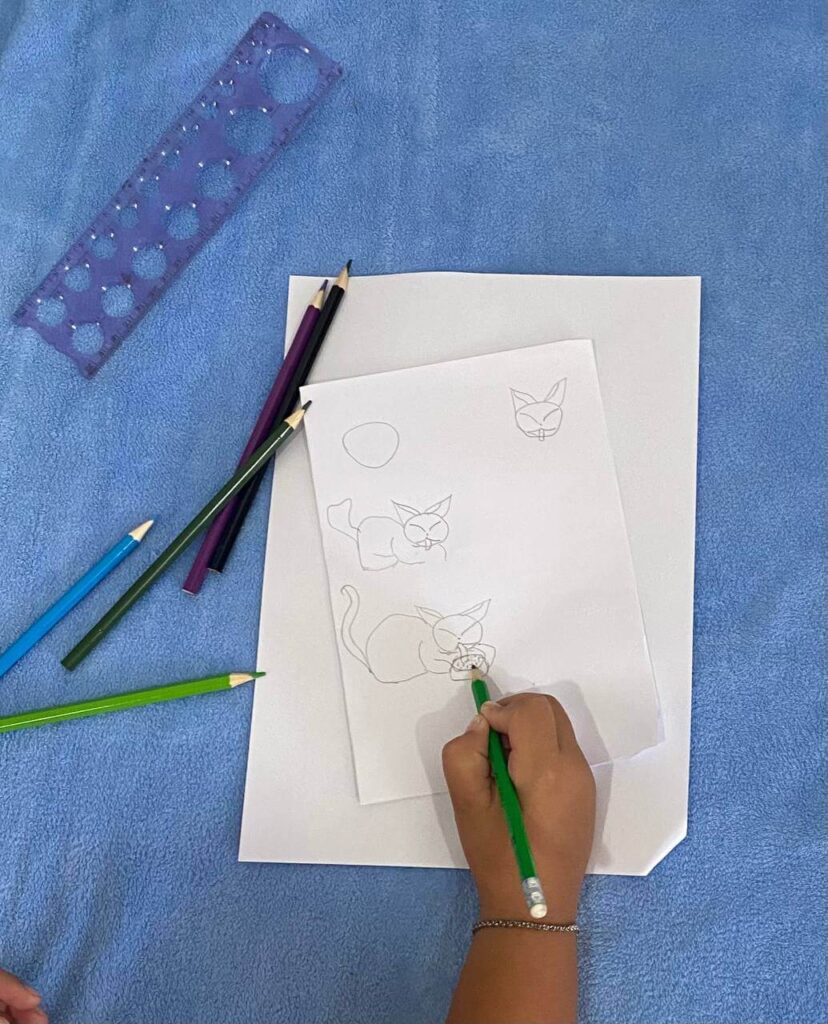
Step 1 — Face Angle: Draw the circle head as usual, but tilt the face slightly downward so the cat appears to be looking at something on the ground.
Step 2 — Body: Draw the body crouched lower and leaning forward behind the head, which gives the impression of the kitten bending toward its food.
Step 3 — The Bowl: Right beneath the kitten’s mouth, draw a small oval bowl. Fill it with little dots or short lines to show crunchy cat kibble.
This pose always gets a giggle from kids because they immediately understand exactly what the cat is feeling.
Make It Your Own
The best part about learning this circle method is that it does not stop at five poses. Once your child understands the starting shape, the rest is pure imagination.
Encourage them to add stripes, spots, fluffy fur, or accessories like collars, bows, or little hats. They can give their cats names and backstories. Some cats can be grumpy, some shy, some bold. The circle is just the door. What comes through it is entirely up to them.
This is also a wonderful drawing activity for kids at home on days when screens feel like too much.
All you need is a few pencils and a quiet corner, and children can easily spend an hour inventing their own little cat world.
Final Thoughts
Learning how to draw a cat easily for kids does not require expensive supplies, formal lessons, or perfect circles.
All it takes is one simple shape, a little encouragement, and the freedom to let the story unfold on the paper.
My daughter now picks up a pencil whenever she has a feeling she wants to express. A sad cat who did not get fed.
A sleepy cat who stayed up too late. A cat waving goodbye at the market. Each drawing is small, imperfect, and completely her own.
That Sunday afternoon taught our whole family something worth remembering: the best drawing sessions are not about getting it right.
They are about the conversation, the laughter, and the little world your child builds one circle at a time.
Now grab some paper, draw that first circle, and see what kind of cat comes to life.
Frequently Asked Questions
Can young kids follow these steps on their own?
Yes, most children between the ages of 5 and 10 can follow these steps with minimal help from a parent. Younger children may need a little guidance drawing the starting circle, but from there, the steps are manageable and genuinely fun. The key is to let them move at their own pace and celebrate whatever they create.
How do I help my child if they get frustrated while drawing?
Break the drawing into very small steps and focus on just one piece at a time. Praise the parts that are working well rather than pointing out what needs fixing. Using the circle method helps because it gives children a concrete, successful starting point every single time. Frustration usually drops once a child feels like they have already done something right.
What can my child draw after learning these cat poses?
Dogs, rabbits, bears, and foxes can all be started from a similar circle method. Once children understand how basic shapes become animals, they often start experimenting on their own. Good next steps include a simple dog drawing for kids or a collection of easy animal drawings for kids using the same shape-based approach.
